
This is the last post of the Double-Faced Hexie Hexalong – for more please see the Overview.
For a start I’ll share with you 3 ways to join the hexies, but there are a few more ways of doing so. I will add them to this post as I happen to do them.
On this page:
♣ A note on joining Double-faced Hexies
♣ Joining with reversed Whip Stitch “Plus”
♣ Joining with Ladder Stitch “Plus”
♣ “Troubleshooting”
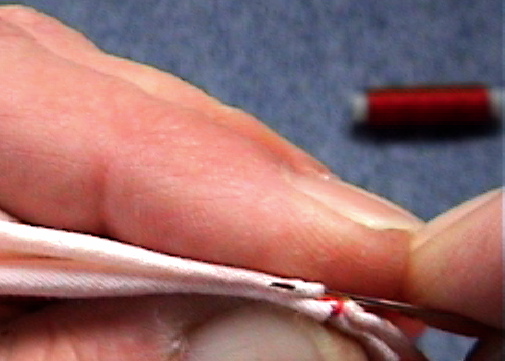
Click on images for larger view
For these examples I used contrasting thread and rather large stitches to emphasise the differences. What looks “sloppy” here will hardly show when you use matching thread and make smaller stitches.
I’ve sewn the hexies from the top, that is “wrong” sides together; you’ll get a slightly different result when you sew from the back – test what you prefer.
A note on joining Double-faced Hexies
The great advantage of Double-Faced Hexies is that you can grow your quilt piece by piece, and when it’s done it’s done – no batting, lining, border or additional quilting necessary (although of course you can add any of those).
The batting or lining or border, however, also adds stability to the quilt, especially to wearable quilts and throws.
The Double-faced Hexies are only held together by stitches, that means that when you make a quilt that will be worn, stretched, washed, serve as a play tent,… or items like bags which may need to hold some weight, it’s a good idea to pay extra attention to the seams.
The “Plus” is a small Backstitch I make every 3 or 4 or 5 stitches, depending on how strong the joint needs to be. Before making this Backstitch, pull the thread tight, but not so tight that the fabric scrunches up.
For sewing “heavy duty” items, use smooth and strong high quality threads. Apart from special quilting thread and thread for sewing jeans you can use … thin cotton crochet yarn (No. 80), the type you’d use for lace around handkerchiefs. It’s a bit thicker than normal thread but it comes in many colours, is a joy to stitch with and very sturdy.
And of course – if you like larger and very visible stitches – you can use embroidery thread like stranded or pearl cotton or smooth linen thread for lace-making.
Joining with reversed Whip Stitch “Plus”
One way of joining hexies which I won’t describe here in detail is the normal Whip Stitch which we used for securing the edge of the ribbons we made.
The way I learned to do EPP = English Paper Piecing was with Reversed Whip Stitch, that is the longer bit of the stitch is hidden in the fabric (my name for it – if you know a different expression please say so).


Joining with Ladder Stitch “Plus”
The Ladder Stitch is slightly looser than the Whip Stitch – be sure to pull the thread tight before you make Backstitches.


“Troubleshooting”
Well, I hope there won’t be much trouble, but there are two issues you might be confronted with.
The open side of a Plain or Half Hexie is a bit too short. Remedy: Roll/push the seam a bit inside, then the opening will become wider. Finger-press the new edge fold. – If you basted with glue stick, you might need to loosen the flaps first.

The corner of a hexie has “disappeared” or moved (happens when the crease was not sharp enough or the hexie has been handled a lot). Remedy: Move = roll the fabric in place and crease again.
In addition, especially with fabric that in general does not hold creases well, it can help to secure the corner point with a small horizontal stitch.


If you have any questions, please post them in the comments.
I hope you enjoyed this Hexalong – have a good week 🙂
Maria
