This is the last post of the Double-Faced Hexie Hexalong – for more please see the Overview.
For a start I’ll share with you 3 ways to join the hexies, but there are a few more ways of doing so. I will add them to this post as I happen to do them.
On this page: ♣ A note on joining Double-faced Hexies ♣ Joining with reversed Whip Stitch “Plus” ♣ Joining with Ladder Stitch “Plus” ♣ “Troubleshooting”
Click on images for larger view
For these examples I used contrasting thread and rather large stitches to emphasise the differences. What looks “sloppy” here will hardly show when you use matching thread and make smaller stitches.
I’ve sewn the hexies from the top, that is “wrong” sides together; you’ll get a slightly different result when you sew from the back – test what you prefer.
A note on joining Double-faced Hexies
The great advantage of Double-Faced Hexies is that you can grow your quilt piece by piece, and when it’s done it’s done – no batting, lining, border or additional quilting necessary (although of course you can add any of those).
The batting or lining or border, however, also adds stability to the quilt, especially to wearable quilts and throws.
The Double-faced Hexies are only held together by stitches, that means that when you make a quilt that will be worn, stretched, washed, serve as a play tent,… or items like bags which may need to hold some weight, it’s a good idea to pay extra attention to the seams.
The “Plus” is a small Backstitch I make every 3 or 4 or 5 stitches, depending on how strong the joint needs to be. Before making this Backstitch, pull the thread tight, but not so tight that the fabric scrunches up.
For sewing “heavy duty” items, use smooth and strong high quality threads. Apart from special quilting thread and thread for sewing jeans you can use … thin cotton crochet yarn (No. 80), the type you’d use for lace around handkerchiefs. It’s a bit thicker than normal thread but it comes in many colours, is a joy to stitch with and very sturdy.
And of course – if you like larger and very visible stitches – you can use embroidery thread like stranded or pearl cotton or smooth linen thread for lace-making.
Joining with reversed Whip Stitch “Plus”
One way of joining hexies which I won’t describe here in detail is the normal Whip Stitch which we used for securing the edge of the ribbons we made.
The way I learned to do EPP = English Paper Piecing was with Reversed Whip Stitch, that is the longer bit of the stitch is hidden in the fabric (my name for it – if you know a different expression please say so).
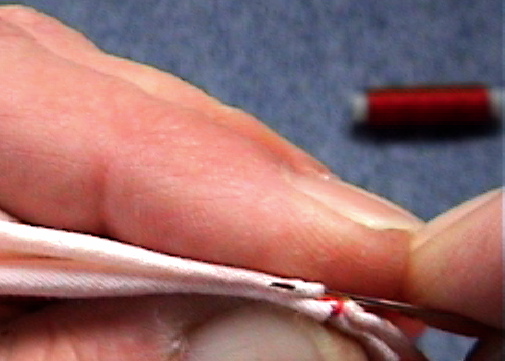
I stitch into the fabric at a small distance to the corner, leaving a tail which I later cut off. I join the corners of the two hexies with two small Buttonhole Stitches – If this happens to be the outer edge of an item, I make three stitches.
I stitch diagonally through both edges, catching a few threads of each fold. – This would be the long bit of the Whip Stitch.
The next Whip Stitch starts exactly below where the needle just came out.
Here you can see the little “Backstitch”, a stitch just through the edge of one hexie,…
…and here how the next “normal” stitch lies on top of it.
At the corner on the other end I make two Buttonhole Stitches. – If I don’t want to sew more with this thread I hide it in the fabric and cut it off, else I pass it through the folds to where it needs to be next.
This is what the front looks like,…
…and this the back.
Joining with Ladder Stitch “Plus”
The Ladder Stitch is slightly looser than the Whip Stitch – be sure to pull the thread tight before you make Backstitches.
The first stitch of the Ladder Stitch: Horizontally inside the edge/fold of one hexie.
The second stitch: Horizontally inside the edge/fold of the other hexie.
The little Backstitch – just repeat the last stitch.
This is what the front looks like,…
…and this the reverse.
“Troubleshooting”
Well, I hope there won’t be much trouble, but there are two issues you might be confronted with.
The open side of a Plain or Half Hexie is a bit too short. Remedy: Roll/push the seam a bit inside, then the opening will become wider. Finger-press the new edge fold. – If you basted with glue stick, you might need to loosen the flaps first.
Adjust opening of Plain Hexie.
The corner of a hexie has “disappeared” or moved (happens when the crease was not sharp enough or the hexie has been handled a lot). Remedy: Move = roll the fabric in place and crease again.
In addition, especially with fabric that in general does not hold creases well, it can help to secure the corner point with a small horizontal stitch.
Adjust corner of Flower Hexie.Pinch in place.
If you have any questions, please post them in the comments.
I hope you enjoyed this Hexalong – have a good week 🙂
This post is part of the Double-faced Hexie Hexalong – for more information please see the Overview.
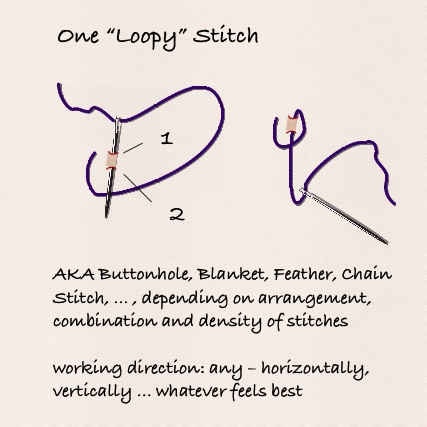
You may know the Buttonhole or Blanket Stitch, the Feather Stitch or Chain Stitch, or perhaps some other variation – there are so many in this loopy family, and quite a few have several names 🙂
On this page: ♣ The principle of Loopy Stitches ♣ Some examples – with metallic threads on Flower Hexies ♣ An additional tip for embroidering hexies
Click on images for larger view
The principle of Loopy Stitches
What makes a Loopy Stitch different from other stitches?
After the needle comes out from the fabric, it stays within the loop made by the thread and the thread crosses itself – something we usually try to avoid, but here it’s what we want.
When we pull the thread tight, the loop becomes smaller.
Some examples – with metallic threads
By the way: Loose, generous Loopy Stitches are great for working with the often difficult metallic threads! And the stiffness of the metallic thread contributes to nice loops 🙂
Blanket Stitch – outwards.Blanket Stitch – inwards.Feather Stitch – first stitch.Feather Stitch – second stitch.
An additional tip for embroidering hexies
The centers of the Trefoil, Pinwheel and especially the Flower Hexie are very delicate. They are well protected by a couched coil or fabric-covered button, but if you want for instance to add some sequins or beads, they fray easily.
The remedy is to create a “safety net” of threads that are well anchored in the fabric just outside the center. When attaching the sequins or beads, you can then latch onto those threads.
For creating the safety net, start with a few stitches for instance with the sewing thread, or with the embroidery thread right after you fastened it (see image below – I’ve started stitching the center with metallic thread. The red sewing thread is waiting to attach sequins and beads once the embroidery is done.).
Reinforce center of hexie.
When you finish a “petal”, don’t move on to the adjacent one, but skip one or go across the center. This way you reinforce the network without additional effort. If it looks messy, you’re on the right track 😉
If you have any questions, please post them in the comments.
Today I show you how I add batting to the Double-faced Hexies, in case you have a project that requires it.
On this page: ♣ Materials and tools today ♣ A note on adding batting or wadding to the hexies ♣ Marking and cutting the batting ♣ Basting/securing the batting ♣ For you to do ♣ Next time
Materials and tools today
hexagons
batting/wadding, a piece of flannel or terrycloth
for batting of a large Hexie: Small Hexie Template (not the Small Flower Hexie Template)
light coloured felt tip marker (see also Marking and Cutting below)
glue stick
sewing thread and needle
scissors
Click on images for larger view
A note on adding batting or wadding to the hexies
There are no “rules” to this, neither for the materials nor the process. I’ll just show you how I do it.
For myself, I don’t add any batting at all to small hexies, and I find Flower Hexies in general thick enough to do without batting. Regarding the others, that depends very much on the project, as does the material for the batting itself.
Securing the batting
Just adding the batting is not enough for projects that are handled or worn and washed, as the batting might move around. Therefore the batting needs to be secured close to the edge, at least near the corners.
For this you’ve got a choice of possibilities:
Invisibly = while doing some embroidery on the front by catching a bit of the batting at several points.
Visibly = on the reverse side, with embroidery or sewing thread. Especially the Plain and Half Hexies can be quilted through all layers.
If you want to secure the batting only on the reverse side, you can do that before you fold or sew the hexie or afterwards, when it’s finished.
Marking and cutting the batting
There’s one thing cotton, wool or polyester batting and terrycloth have in common: It’s a bit difficult to mark them.
Fortunately batting is malleable and quite forgiving as far as precision is concerned 😉
The batting needs to be a bit smaller than the hexie, else it may not lie flat; about 3mm // 1/8 inch less is fine unless your batting is really thick.
I mark it with a felt tip marker – when using a washable one, test that first. Some marker dyes and some fabrics really like each other… Also, when your fabrics are light and rather thin, dark or intense colours may shine through.
Mark the batting inside the Small Flower Template…
…with a felt tip marker. – If you want to mark multiple pieces of batting honey-comb fashion, place the template so the marking of the previous hexies shows inside the template.
Cut the batting on the marked line or cut the line off – the idea is to have the batting a little bit smaller than the hexie.
For folded hexies (Trefoil or Pinwheel), mark the center of the batting. You can fold the batting in half and in half again…
…and mark the folded tip.
Basting/securing the batting
Start the folded hexie (in the background) as usual,…
…then insert the needle in the center of the batting. – Now you have two options for basting: 1. lift the corners of the batting and apply some glue stick (yes, after you pulled the thread through the center – prevents sticky fingers)…
…or 2. baste it with a few stitches using a second thread so you can pull it out later – I should have used a different colour thread to emphasise this more. – Alternatively, you can secure the batting with “nice” stitches, in which case you can use the same thread.
This is what the basting looks like on the reverse.
For Plain and Half Hexies, just start basting without tying a knot. Glue basting might come off when turning the hexie.
Make sure you catch only one layer of the fabric, else you can’t turn it.
The reverse = second layer: no stitches.
Alternatively you can baste or secure the batting just after you marked the hexies – this way you’ve got to deal only with one layer of fabric.
For you to do
From “plenty” to “nothing” – as you like:
“Nothing” consists in bookmarking this page for further reference 😉
“Plenty” could consist in taking for instance a couple each of the Pinwheel Hexies, Plain Hexies and Half Hexies, the same type of batting for all, and then testing whether you prefer securing the batting in advance to making the hexie or afterwards.
At the same time you can try out the different ways of securing them.
Next time
My review revealed that the content could do with a different organisation or structure. Therefore the rest of this workshop/tutorial will be in form of mini-posts.
If you have any questions, please post them in the comments 🙂
A Plain Hexie is like a tiny quilt in itself – just two layers of fabric, plus, if you want, some batting. The Half Hexies are for achieving straight edges all around a larger quilt, but also within the quilt.
On this page: ♣ Materials and tools today ♣ A note on the templates for Plain Hexies ♣ The Sew First, Cut Later method ♣ Half Hexies ♣ Tracing multiple Plain Hexies ♣ For you to do ♣ Next time
Materials and tools today
fabric (two scraps for one hexie – any colour or pattern
marking pen or pencil/sharpener
sewing thread and needle
scissors for cardboard and fabric
pins or safety pins
Click on images for larger view
A note on the templates for Plain Hexies
The Plain Hexie templates – as you find them in the pdf – are intended for machine sewing. The seam allowance (= the space between the dotted and the continuous line) is about 6 mm // 1/4 inch, so you can just align the cut edges with the footer of your sewing machine (it’s best to make a test hexie and measure it) >> tracing around the template will give you the line for cutting the fabric.
Cutting the Plain Hexie Template to adjust it for hand sewing
For hand sewing, cut the template right on the dotted line >> tracing around the template will give you the line for sewing the fabric, which means you need to add the seam allowance before you start cutting.
BUT: Both for hand sewing and machine sewing there is a different way, which I personally prefer because it leads to precise results without requiring precise cutting, a great advantage when cutting with scissors: Sew first, cut later.
The Sew First, Cut Later method
For a large Plain Hexie I use the Small Flower Hexie Template, which is slightly larger than the normal one and just right for what I want to do.
I haven’t added an equivalent template for making a small Plain Hexie with the sew first, cut later method as the tracing wasn’t precise enough – I recommend you use the cut-down template (see above) and estimate the seam allowance when cutting (see also end of tutorial).
Tracing
Material and tools: Enough fabric for two hexies *** the Plain Hexie Template or (for a large hexie) the Small Flower Template *** marking pen or pencil *** pins or safety pins *** glue stick *** scissors
I place the two scraps of fabric right sides together – or, like here, fold a larger piece of fabric right sides together. I pin the two layers.
I trace the hexie inside the template,…
…and mark the corners by twirling the pencil a bit. – As I sew, I handle the fabric, and sometimes the lines disappear – the dots don’t, at least not as easily.
I also trace outside – this indicates the seam allowance = cutting line.
Because there’s enough room, I trace another hexie. – Towards the end of this tutorial I show you how to place hexies on a larger piece of fabric.
Here are the two traced hexies – I hope you can see the lines.
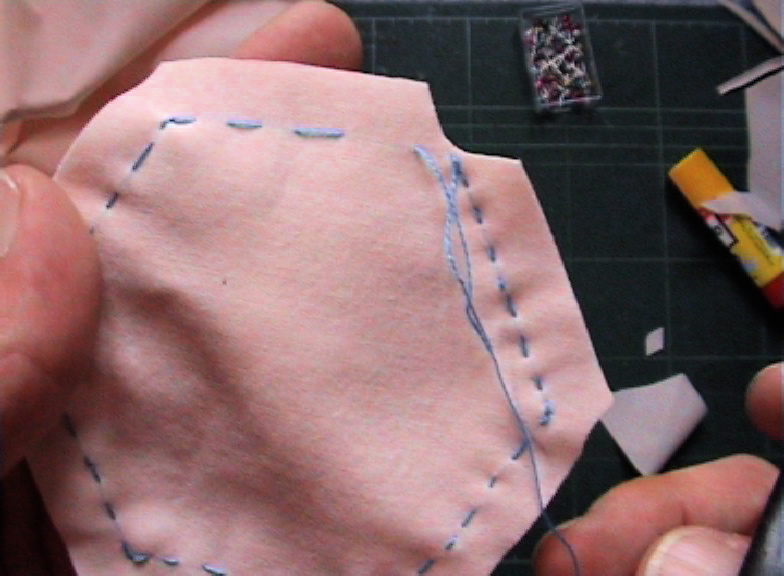
Sewing & cutting
For sewing the seams I use a combination of a few Running Stitches and a Backstitch. The stitches can be fairly long because the seams don’t need to be strong, but the Backstitches are necessary to keep the thread tight so the seams won’t open, especially at the corners.
I begin at a corner. As usual, I make a small stitch, leave a tail, and tie that tail down with a small Buttonhole Stitch. All stitches are right on the line.
Then I gather a few Running Stitches, for a large hexie like this up to the middle. They don’t need to be very small, as this seam does not have to be strong. – With a small hexie, the last stitch comes up right at the next corner.
I pull the thread through…
…make a small Backstitch…
…gather more stitches (the last comes out at the corner) and pull the thread through.
This is the reverse.
At the corner I make a small Backstitch which comes out just after the corner and pull the thread through.
From there I make a small Backstitch right into the corner,…
…gather a few Running Stitches, and so on for five edges.
At the last corner, that is with only one edge to go which will remain open for turning the hexie, I make a small Backstitch…
…and then secure the thread with a small Buttonhole stitch, right on the line.
I baste the last edge closed – this way I can easily press this open seam in a straight line – and pull the needle off the thread.
Two hexies are sewn.
I cut along the marked pencil line.
As I get to the second hexie, I just cut them apart.
The cut hexie.
If I leave the seams as they are, there will be a lot of bulk in the corners once the hexie is turned. – I hold the scissors as if I wanted to cut along the seam, but I cut only until just before the seam (distance: a few threads).
Then I turn the hexie very slowly while cutting even slower until the scissores seem to come from the direction of the seam.
You can see better what I mean on this photo – there’s a slight curve next to the corner, and the direction of the cuts are the same direction as the seams.
Basting
After much skepticism, I’ve come to love basting with a glue stick, at least in cases like this where I only need temporary hold but can’t use pins.
The trick is to apply sufficient but not too much glue – try the edge of the glue stick which gives a thinner line. After basting with glue stick, let it dry. That can take up to an hour, but you can speed it up by ironing (between two pieces of baking paper, just in case the glue has spread beyond the flaps).
Most glue sticks wash out of most fabrics with warm water and a bit of detergent, but when in doubt, test it first.
Note: Basting is not an obligatory step. If you want to do without, finger crease the open edge well, from both sides, before you remove the basting thread. Then turn the hexie inside out.
On a hard surface, I apply a bit of glue stick on the seam allowance “flaps”, all along the seam.
I fold the upper flap onto the fabric and finger press it. The seam itself guides me with achieving a straight line.
I do this all around.
Then I remove the basting thread. I leave it out if I want to use it to sew the open edge closed after turning the hexie, else I cut it, leaving a tail.
I flip over the hexie and again I apply glue.
It’s not absolutely necessary, but I hide the thread tails as I fold over the seam allowance.
Like this.
I can also fold the flaps “in the air” – helps me to see better whether the corners are neat.
Here an edge where both flaps are folded, right by the seam.
At the open edge, I haven’t got the basting thread as a guide any more, so I align the second fold exactly with the first one.
Turning the hexie inside out
With the opening facing downwards, I get hold of the fabric on both sides and pull the hexie apart.
With my thumbs I push the top downwards…
…until it appears through the opening.
I pull it out completely…
…and then straighten the fabric until it starts resembling a hexie.
For shaping the corners, you can use your scissors if the tips are rounded enough to not puke through the seam. I made myself a custom tool for turning small items: An old pencil with rubber on one end…
…and with the tip broken off. I also scraped out some of the lead as I don’t want pencil smudges.
This tip is fine yet blunt enough to push the corners into shape. Sometimes they want to hide – check whether you can see all the stitches.
Finger pressing all edges.
In this example I have left the basting thread. I could use it to stitch the opening shut with ladder stitch (alternating stitches in the upper and lower fold)…
…but I don’t, so I cut it off and tuck it in.
Note: In most cases I don’t close the open edge it’ll be closed automatically when I sew the hexies together (more on this when I show you how to join them).
Half Hexies
Depending on how you fold them, you get two different Half Hexies: edge-to-edge or point-to-point.
For Half Hexies I trace the whole hexie on the wrong side of a single layer of fabric…
…and cut it with a seam allowance.
I fold it right sides together, align the corners and insert a pin right into the corner dot of the top layer…
…and coming out at the corner dot of the reverse layer.
I push the pin through right on the seam line.
When folding point-to-point, the Half Hexie looks a bit like a house. It’s got three pins.
This Half Hexie is folded edge-to-edge, with two pins.
When sewing an edge-to-edge Half Hexie, sew two edges, secure the thread, and baste the third edge which will be the opening.
With the point-to-point Half Hexie, the edges right by the fold are too short for turning the hexie comfortably. Here’s what I do:
secure thread near the fold
sew short edge to first corner
secure thread
baste this first long edge (if I want to use the basting thread later to close the gap, I leave sufficient extra thread before I secure it at the next corner)
secure thread at second corner
sew all the way to the end
secure thread and cut
Before turning the hexie, all I need to do is to cut through the basting thread and remove it.
You probably won’t need to snip off any seam allowance at the folds.
Tracing multiple Plain Hexies
When you want to make several Plain Hexies with the same fabrics, you can economise fabric by arranging them in honeycomb fashion (the tracing didn’t come out well on this photo, you can see it better in the enlarged view – click the image).
If you don’t want to trace the seam allowance, just make sure you’ve got a distance of twice the seam allowance on all sides between the hexies!
Tracing multiple hexies in a honeycomb arrangement.
For you to do
Make at least one Plain Hexie, and perhaps one each of the Half Hexies.
Next time
Next week we’re going to tie up some loose ends:
how to insert batting (or a layer of flannel or terry cloth)
“loopy” stitches
different ways of joining the hexies
Now that we’ve covered most of the basics – and I’m sure you’ve started developing project ideas of your own – I also want to show you some projects I’ve made / am still making this weekend. Which is why I’m not quite sure yet about the order of the tutorials and whether the next post will be on Monday.
Stay tuned!
If you have any questions, please post them in the comments 🙂
Top: Pinwheel Hexie with whip-stitched flat button *** Left: Flower Hexie with fabric-covered four-hole button *** Right: Flower Hexie with button-decorated, rimmed one-hole button
Embellishing the centers of our hexies is not only about making them pretty, but also about securing and protecting them. Without adequate embellishment, they might easily fray and tear apart. Just like couching, sewing on buttons is ideal.
On this page: ♣ Materials and tools today ♣ Sewing on a button – the quick way 🙂 ♣ Sewing on the fabric-covered four-hole button ♣ Sewing on a fabric-covered button – invisibly ♣ Sewing on a fabric-covered button – very visibly 😉 ♣ For you to do ♣ Next time
Materials and tools today
some hexies, ready to have their centers embellished
the buttons you made
sewing/embroidery material and tools (a thimble might be helpful)
scissors
if you have some, small buttons or beads for decoration
Click on images for larger view
Sewing on a button – the quick way
To begin with, I’ll sew on a normal plastic button – with thick crochet yarn, but you can also use embroidery yarns.
The advantage is that I need to go only once through the holes and still have multiple threads holding the button securely on the fabric. The most important part is tying a really tight knot (= two half knots; a half knot is what you start with when tying your shoelaces).
And yes, that’s also how I often sew buttons onto garments or other textiles 🙂 The thick thread also gives the button that little extra space it needs to sit nicely on top of the buttonhole.
Material and tools: hexies *** the buttons you made *** ready-made buttons (or beads, sequins) *** embroidery and sewing threads and needles *** scissors
Stitching in and out close to the center (but not too close, that is going through sufficient fabric) I pull the thread through, leaving a tail long enough that I can later tie a knot with it.
On the other side of the center, I make a similar stitch.
The third stitch comes up in the center – you can see that two large parallel stitches are on either side of the center.
Pulling the thread tight.
Passing the needle through the first buttonhole.
Passing the needle back down through the second buttonhole.
Passing the needle underneath the two parallel stitches.
And only now I pull the thread tight.
Coming up through the third hole…
…and going back down through the fourth. I pull the thread through.
The last stitch goes in, again through sufficient fabric,…
…and out close to the tail.
Tying a half knot, pulling it tight, and tying a second one. Then I snip off the thread ends.
Voila!
Sewing on the fabric covered four-hole button
I do it exactly as if it were a normal button. Here I used stranded cotton; the crochet yarn would have been too thick to pass through the fabric.
It can take a bit of probing and patience to find the first hole in the hidden plastic base, but once you got that, you can estimate where the others are.
Sewing on a fabric-covered button – invisibly
I’m using the one-hole button with a rim. I want to emphasize the rim by tying the fabric down at the center of the button, for instance with a small button (or a bead or sequin) or a little cross stitch.
As this is only decoration (and actually can be done beforehand), the button needs to be attached securely and invisibly in a different way, with small Ladder Stitches (as shown) or Whip Stitches.
As I hadn’t snipped the sewing thread off this hexie, I’m just going to use that = insert it in a needle. – Alternatively, I could use the thread from the button.
I stitch into the button from the reverse, probing for the center hole (which is quite easy in comparison to the four-button hole).
Here comes the needle.
I sew on the button only superficially, that is without going back and forth through the one hole in the plastic. *** Therefore you can also sew on little buttons and beads just after you made the button.
Here I go through the holes only once. – If you want to do that with an item that is exposed to wash and wear, use embroidery thread or make several stitches.
With the last stitch I go back through the center hole.
Coming out at the reverse of the button. As you can see, that one thread does not do much to keep the button on the hexie.
What I’ll show you now is exactly as I invisibly attach flat and padded buttons, too: with Ladder Stitch. – The first stitch goes through a fold close to the rim, just so it’s hidden.
The second stitch goes through the fabric underneath, just where it will still be hidden by the button – check that!
And this is how I really do it – both stitches in one go. They should still be fairly horizontal and catch several threads of the fabric. – Every thre stitches or so I pull the thread close. If you want, when the buttons are large, or when the item is in for heavy duty, make small Backstitches.
Once I finished the round, I secure the thread with two tiny Buttonhole Stitches,…
… pass it straight through the fabric of the button to the other side and cut it.
Alternative: Instead of sewing on a small button, I could just have made a little cross stitch to show of the rim of this one-hole button.
Sewing on a fabric covered button – very visibly
Instead of using sewing thread and hiding the stitches, I’m using embroidery thread. You can do this with different stitches (for instance Whip Stitch, Herringbone, Buttonhole) but need to adapt them a bit – it’s not possible the normal way because of the plastic base. You’ll see what I mean.
I’ll attach a flat button, but you can do the same with a padded one.
I begin with securing the embroidery thread with my usual Buttonhole Stitch that also catches the tail of the thread.
I make a small stitch right underneath the rim of the button.
Then I position the button…
and make a small stitch in the fabric, just next to the rim.
Then I make a long stitch (I’m faking a Whip Stitch here).
Short stitch into the fabric – and so on until you finished the round.
When the tail gets in the way, just tuck it in with your needle.
The round is done.
To secure the thread, I make one last horizontal stitch, right behind a couple of previous stitches,…
…and secure it with a Buttonhole Stitch around the last stitch I passed.
I pass the needle through the fabric at the reverse of the button straight to the other side and cut it off.
For you to do
Try, test, play around and see how you can get the buttons onto your hexies!
Next time
On FridaySaturday = Day 11 I’ll show you how to make the last one-and-a-half – the Plain Hexies.
You don’t need to pre-cut anything (I’ll show you a different method), but you’ll need the Large or Small Plain Hexie Template. If you only want to make a large Plain Hexie, you can also use the small Flower Hexie template.
Else:
fabric (two scraps for one hexie – any colour or pattern, or different, we’re not going to embroider it)
marking pen or pencil/sharpener
sewing thread and needle
scissors for cardboard and fabric
pins or safety pins
If you have any questions, please post them in the comments 🙂
The Flower Hexie is the third Double-faced Hexie of this series. It’s great as a stand-alone ornament for instance for attaching to bags, place mats, cushions, accessories, but also pops up from any flat surface.
Depending on fabric, embroidery and embellishments, it can look like a straightforward geometric shape, a flower, a star, or a crystal.
On this page: ♣ Materials and tools today ♣ Marking the Flower Hexie ♣ Folding and stitching the Flower Hexie ♣ For you to do ♣ Next time
Materials and tools today
a cut hexie (Tip: start with a large Flower Hexie; until you know what to do, they’re are a bit easier to fold). If you want it to match the Trefoil and Pinwheel Hexies in finished size, use the Flower Hexie Template from page 2 of the template set.
the Flower Template and the Star Template (from page 3 of the template set)
sewing needle and thread
scissors
Click on images for larger view
Marking the Flower Hexie
Lay the cut hexagon right side up on a hard working surface. Then put the Flower Hexie Template around the cut hexie.
Put the Star Template inside the Flower Template and align the points with the green halfway marks.
Hold Star Template down and mark the inner points with a marking pen or pencil.
The marked hexagon.
Close-up. I marked with dark blue coloured pencil which I twirled to make the dot really obvious for you (= the right dot). You’ll just want it to be visible and not rub off before you need it (= left dot).
Folding and stitching the Flower Hexie
The first round: Gathering the petals
As usual, I start with the center cross, with the wrong side of the fabric facing up.
Unlike the Trefoil and Pinwheel Hexies, I make the stitches at the middle of an edge, not the corners.
To find that middle, I fold the two adjacent corners backwards (= right sides together).
I pinch the fold a bit, but only right by the cut edge.
I catch a few threads of the edge (not too close to it)…
…and pull a bit. You can see how the edge folds inwards.
I do the same with the following edges.
Here you can see what we’re going for.
To close the round, I make one stitch outwards right by the first stitch.
Pulling tight.
Securing with two (!) small Buttonhole Stitches.
Now find a dot, with a corner of the fabric showing towards you, and pinch the edge on either side of it into a sharp point (no need to crease the hole edge now). – Repeat for all dots/corners.
If you haven’t marked the hexie – or if the dots have become invisible – you can fold each side like this in order to find the new corners.
Check the folds with the Star Template.
The second round: Folding and stitching the petals
Find a dot,…
…and from that dot fold the corner towards the center of the hexie. The two folds underneath should be as close together as possible. Press.
From the dot downwards,…
…I crease the new folds, first one side…
…and then the other. I use the nail of my thumb to get a sharp crease.
With the needle, I temporarily get hold of a few threads near the corner – not too close or it might fray.
With the index finger of the other hand I hold the upper part down while lifting the corner upwards,…
…all the way to the point.
You can see how the two raw edges meet in the middle.
I hold the needle against my index finger while creasing the new folds all around – once again, as sharply as possible.
Then I hold the flap and reposition the needle – you can feel where the layers are underneath.
Keeping the needle where it is, I fold the flap down and once more creas the folds. – No worry if you can’t get all the layers perfectly aligned to a point; there’s always something that slips. Just do your best 🙂
I’m going to make the petals clockwise = to the right. Therefore I start stitching the layers down on the left side of the petal – one stitch through both folds and catching a few threads from the fabric underneath.
Then on the right side of the petal: Catching a few threads from underneath and through both folds. – Then move on to the next petal to the right, but only stitch down the left side of it.
I decide to do 3 extra stitches to unite the two petals, that is to keep them from opening up. These extra stitches are not absolutely necessary – and the Flower Hexie (left) will look slightly flatter – but I do recommend making this little extra effort for any hexies that are going to be handled a lot, or washed, or are made from fabrics that don’t hold creases well – saves a lot of bother later…
The first stitch goes into the corner of the right flap of the left petal, just a little bit towars the back so it won’t show on the front.
Perhaps you can see the fosition here.
The second stitch goes through the corner of the left flap of the right hexie – but this time the needle comes from underneath.
Before pulling the thread through, I also catch – coming from below – the lower fold of the left petal again, right where I did the first stitch.
The third stitch goes between the folds of the right petal, coming out near the center where I started off.
Perhaps you can see the threads here – I opened it. When the hexie lies flat, though, the thread won’t show. *** Repeat for all petals, then secure the thread as usual with two Buttonhole Stitches.
For you to do
Make at least one large Flower Hexie. When you feel comfortable with that, make a small one as well. You can also embroider them as you like 🙂 – have fun!
Next time
On Wednesday = Day 10 I’ll show you some variations on how to sew the fabric-covered buttons in the centers of the hexies.
Apart from the buttons you made and some hexies, you’ll need sewing/ embroidery material and tools and perhaps small buttons or beads for extra decoration.
If you have any questions, please post them in the comments 🙂