

<< Overview << previous: Day 10
Day 11
A Plain Hexie is like a tiny quilt in itself – just two layers of fabric, plus, if you want, some batting. The Half Hexies are for achieving straight edges all around a larger quilt, but also within the quilt.
On this page:
♣ Materials and tools today
♣ A note on the templates for Plain Hexies
♣ The Sew First, Cut Later method
♣ Half Hexies
♣ Tracing multiple Plain Hexies
♣ For you to do
♣ Next time
Materials and tools today
- fabric (two scraps for one hexie – any colour or pattern
- marking pen or pencil/sharpener
- sewing thread and needle
- scissors for cardboard and fabric
- pins or safety pins
Click on images for larger view
A note on the templates for Plain Hexies
The Plain Hexie templates – as you find them in the pdf – are intended for machine sewing. The seam allowance (= the space between the dotted and the continuous line) is about 6 mm // 1/4 inch, so you can just align the cut edges with the footer of your sewing machine (it’s best to make a test hexie and measure it) >> tracing around the template will give you the line for cutting the fabric.
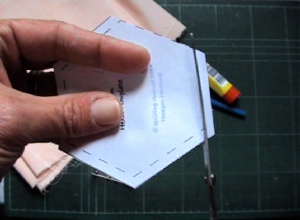
For hand sewing, cut the template right on the dotted line >> tracing around the template will give you the line for sewing the fabric, which means you need to add the seam allowance before you start cutting.
BUT: Both for hand sewing and machine sewing there is a different way, which I personally prefer because it leads to precise results without requiring precise cutting, a great advantage when cutting with scissors: Sew first, cut later.
The Sew First, Cut Later method
For a large Plain Hexie I use the Small Flower Hexie Template, which is slightly larger than the normal one and just right for what I want to do.
I haven’t added an equivalent template for making a small Plain Hexie with the sew first, cut later method as the tracing wasn’t precise enough – I recommend you use the cut-down template (see above) and estimate the seam allowance when cutting (see also end of tutorial).
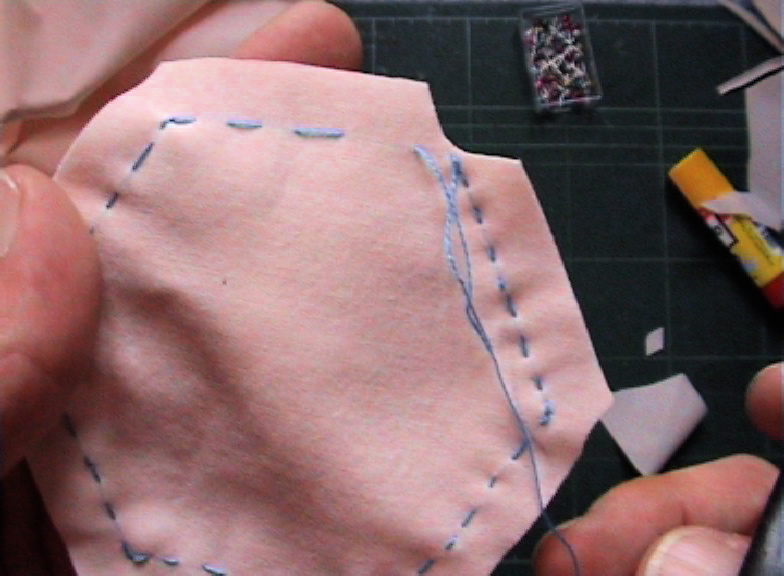
Tracing


Sewing & cutting
For sewing the seams I use a combination of a few Running Stitches and a Backstitch. The stitches can be fairly long because the seams don’t need to be strong, but the Backstitches are necessary to keep the thread tight so the seams won’t open, especially at the corners.


Basting
After much skepticism, I’ve come to love basting with a glue stick, at least in cases like this where I only need temporary hold but can’t use pins.
The trick is to apply sufficient but not too much glue – try the edge of the glue stick which gives a thinner line. After basting with glue stick, let it dry. That can take up to an hour, but you can speed it up by ironing (between two pieces of baking paper, just in case the glue has spread beyond the flaps).
Most glue sticks wash out of most fabrics with warm water and a bit of detergent, but when in doubt, test it first.
Note: Basting is not an obligatory step. If you want to do without, finger crease the open edge well, from both sides, before you remove the basting thread. Then turn the hexie inside out.


Turning the hexie inside out


Note: In most cases I don’t close the open edge it’ll be closed automatically when I sew the hexies together (more on this when I show you how to join them).
Half Hexies
Depending on how you fold them, you get two different Half Hexies: edge-to-edge or point-to-point.


When sewing an edge-to-edge Half Hexie, sew two edges, secure the thread, and baste the third edge which will be the opening.
With the point-to-point Half Hexie, the edges right by the fold are too short for turning the hexie comfortably. Here’s what I do:
- secure thread near the fold
- sew short edge to first corner
- secure thread
- baste this first long edge (if I want to use the basting thread later to close the gap, I leave sufficient extra thread before I secure it at the next corner)
- secure thread at second corner
- sew all the way to the end
- secure thread and cut
Before turning the hexie, all I need to do is to cut through the basting thread and remove it.
You probably won’t need to snip off any seam allowance at the folds.
Tracing multiple Plain Hexies
When you want to make several Plain Hexies with the same fabrics, you can economise fabric by arranging them in honeycomb fashion (the tracing didn’t come out well on this photo, you can see it better in the enlarged view – click the image).
If you don’t want to trace the seam allowance, just make sure you’ve got a distance of twice the seam allowance on all sides between the hexies!

For you to do
Make at least one Plain Hexie, and perhaps one each of the Half Hexies.
Next time
Next week we’re going to tie up some loose ends:
- how to insert batting (or a layer of flannel or terry cloth)
- “loopy” stitches
- different ways of joining the hexies
Now that we’ve covered most of the basics – and I’m sure you’ve started developing project ideas of your own – I also want to show you some projects I’ve made / am still making this weekend. Which is why I’m not quite sure yet about the order of the tutorials and whether the next post will be on Monday.
Stay tuned!
If you have any questions, please post them in the comments 🙂
Maria
