<< Overview << previous: Day 1, Part 2
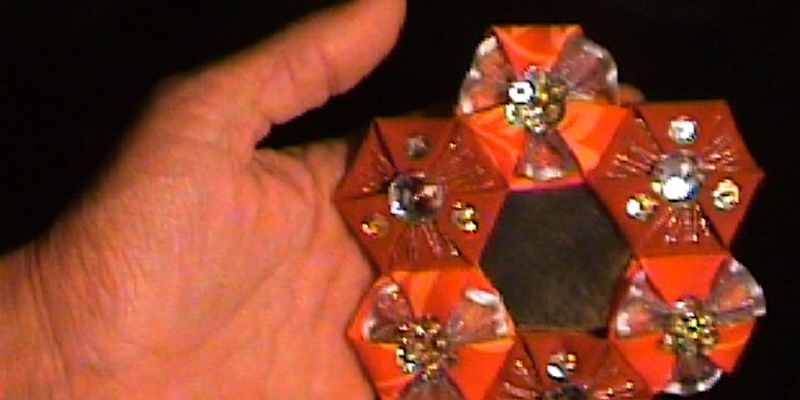
The first three hexies – just as they’re finished. How could you decorate and embellish them? Which projects could you use them for, as stand-alones or in combination with “normal hexies?

plain Trefoil Hexie

plain Pinwheel Hexie

plain Flower Hexie
Today a friend asked me what kind of projects she could make with these Double-faced Hexies.
Well, most of what you can make with normal hexies, be they sewn by machine or by hand, for instance EPP = English Paper Piecing.
The Double-faced Hexies can be made in any size you like – although personally I wouldn’t fancy folding hexies smaller than our small template, which results in a hexie with a side length of roughly 2.5 cm – 1 inch. If you’re into tiny mini hexies, you’ll get faster results the traditional way (see below).
The project size ranges from single hexies (examples: attached to napkin rings, hair pins, embellishments sewn on to pillows, blouses, napkins,…) over small groups of hexies (examples: pincushions, cases for glasses, purses, photo frames, journal covers,… or larger groups (examples: pillowcases, cushions, tote bags, place mats, table runners, fronts for waistcoats,…) to really big projects like double-faced tablecloths, king-sized bedspreads and beyond.
The biggest difference between the Double-faced Hexies and the “normal” way of doing a quilt is the process:
Traditionally, in quilting you have 3 layers – top layer, batting, and backing – which are joined and quilted together into one big sandwich.
The top layer is often made as patchwork, for instance with hexagons sewn together. Not considering the seams, this is a single layer of fabric.
Once this layer is finished – for instance the size of a bedspread – it is combined with batting and backing the size of the top and then quilted. A big (and often heavy) project!
With Double-faced Hexies, you finish one hexie = one mini sandwich at a time. Batting is often not necessary as the hexies have at least 2 layers of fabric already – but you can easily add to each hexagon a bit of batting for extra padding. I’ll show you in a later post how to do that.
That means that you can for instance make a king-size bedspread by joining single hexies into groups or strips, then into larger groups or wider strips and so on, but until the very end you don’t have the whole bulk. You keep your project manageable = transportable, quilting on the go and as you go.
And once you’ve sewn the hexies together, your project is finished!
Another significant difference is the added dimension.
Because traditional hexies consist of just one layer of fabric, they are flat.
The Double-faced Hexies however are folded (plus one variety which is plain), which adds a lot of three-dimensional texture to the surface. Plus there are various quick ways of embellishing them for special effects.
The different types of Double-faced Hexies (plain or folded) can also be mixed and matched as the templates are coordinated in size.
[examples/images will follow here]
Last but not least: Multiple ways of joining the hexies
Because we are working with single pieces, we can join them in many different ways, including leaving space between the hexies for a lacy look, combining them with other techniques like crochet, or filling spaces with needle lace.
Which means that with these hexies you can do many things that you can’t do the traditional way.
Special designs for Double-faced Hexies
I’m very busy at the moment stitching projects (smaller ones which don’t involve more than a dozen or so hexies) which utilise all these special features. I’ll post them as I go, in stages.
Where to get more ideas
For hexie projects in general, enter for instance the following words or phrases into a search engine (like google, bing,…) and click images:
quilting hexagons
quilting hexies
quilting hexagons small projects
I hope this cleared a bit of confusion. If not, please ask questions in the comments section.
Tomorrow = Day 2 we’ll start with some simple embroidery. Apart from two Trefoil Hexies you’ll need embroidery thread, an embroidery needle with a sharp point and scissors.
Maria
Share this with family, friends and colleagues: