<< Overview << previous: Day 6
Day 7
Today we’ll see how we can use the Backstitch Family for our hexies – and if you’ve got problems with the Herringbone Stitch, maybe I can help you 🙂
On this page:
♣ Materials and tools today
♣ Moving forwards with Backstitches
♣ How to sew Herringbone Stitch – and how to remember it
♣ “Bead” Stitches
♣ Your task today
♣ Next time
Materials and tools today
- a Hexie
- embroidery thread & needle
- scissors
- small beads, if you have some
Click on images for larger view
Moving forward with Backstitches
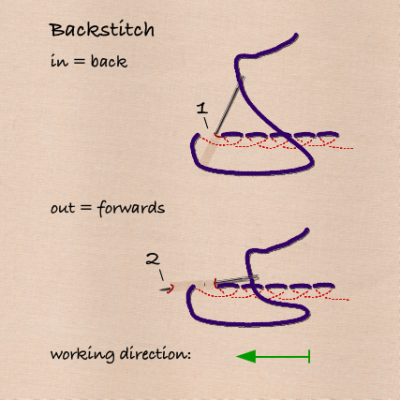
The optical difference between Running Stitches and Backstitches is that the Running Stitch is sort of woven into the fabric, whereas the Backstitch lies on top of it – the thicker the thread, the more obvious that becomes.
Remembering Backstitch: the needle points in the working direction
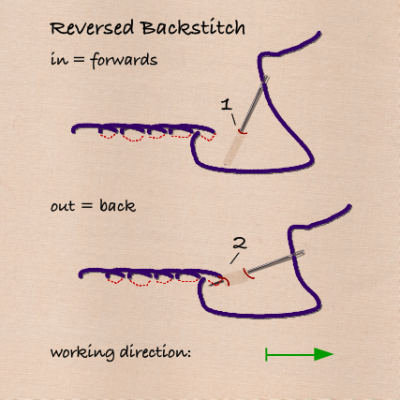
Remembering Reversed Backstitch: the needle points away from the working direction
How to sew Herringbone Stitch – and how to remember it
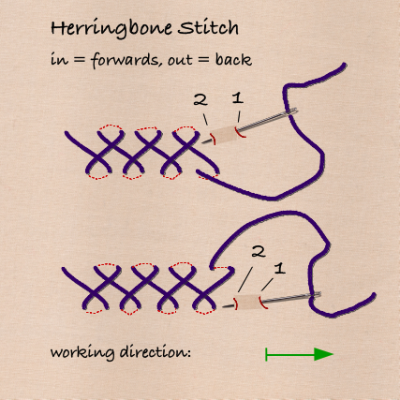
The Herringbone Stitch is not just a great stitch for seams and covering raw edges, but also for filling areas. It’s just like the Reversed Backstitch, only that you stitch in two rows.
Remembering Herringbone Stitch: = Reversed Backstitch, that is the needle points away from the working direction
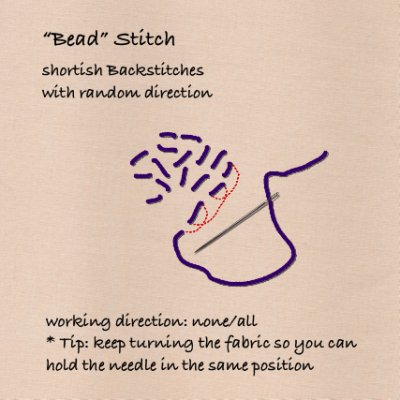
“Bead” Stitches
This is the Backstitch equivalent to the Seed Stitch (in the graphic I left out most of the red lines, it looked confusing).
When you make short stitches with thick thread, they look a bit like beads, especially when you use shiny threads like Pearl Cotton or Silk.
This is also the stitch of choice for attaching beads: Using sewing thread and a thin needle, stitch out, pick up a bead with your needle, backstitch. (More on sewing with beads some other time.)
Your task today
Decorate as many hexies as you like (the new Pinwheel Hexies as well as the Trefoil Hexies) with the Backstitch and its variations.
Next time
Tomorrow = Day 8 we’re going to prepare washable, fabric covered buttons.
You’ll need
- a button big enough to cover the center of your hexies – one side of the button should lie flat; we’re going to use it as a template
- a piece of not-too-thick packaging plastic
- a pen or permanent marker (should not wipe off the plastic)
- sewing pins
- something thicker than a pin, to poke holes with (push pin, darning needle, skewer)
- something to poke holes in (piece of polystyrene, cork board, a double layer of corrugated cardboard)
- a few scraps of fabric, at least twice as big as the button
- sewing needle and thread
- tiny leftovers of batting (if you have got some), else some yarn or thread leftovers – for padding the button
- glue stick
- scissors, one for cutting the plastic, one for the fabric
If you have any questions, please post them in the comments.
Maria

