


<< Overview << previous: Day 2
Day 3
Of course you can use ready-made ribbons for embellishing your Trefoil Hexies, but what if you want to coordinate fabrics?
There are several ways for doing so, resulting in different edges, but as we’re into the family of Running Stitches at the moment, let’s have a look what we can do with them.
We only need to secure the top edge as the bottom edge will be gathered around the center.
On this page:
♣ Materials and tools today
♣ Two more variations of the Running Stitch
♣ Preparation
♣ Securing a folded edge
♣ Samples
♣ Your task today
♣ Next time
♣ Preview
Materials and tools today
- a strip of cotton fabric 30 to 35 cm // 12 to 14 inches long and at least 2.5 cm // 1 inch wide (for starters – cotton is easier to handle than silk or synthetics)
- embroidery needle and embroidery thread – but you can use matching sewing thread if you want the stitches to be less visible
- scissors
Two more variations of the Running Stitch
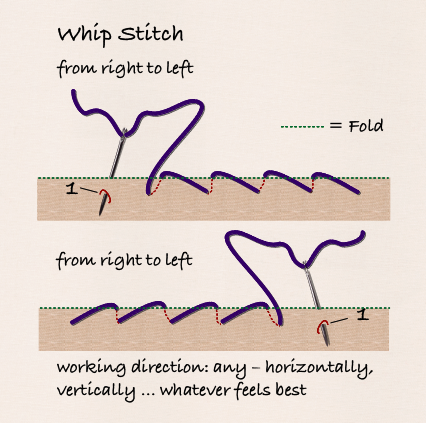
You’ll know them perhaps as Basting Stitch (yes, that’s the one we used for making the sandwich when we cut multiple hexies) and Whip Stitch or Overcast Stitch.
Basically, they’re the same stitch, only that the Whip Stitch goes across a fold – or a raw edge for a more ragged look.

Preparation
Today I’m showing you 2 alternative edges which work for plain and patterned fabrics:
- simple fold: folding a small seam allowance to the back and securing it
- raw edge: simply stitch over the cut edge
There’s nothing to prepare for the raw edge 🙂
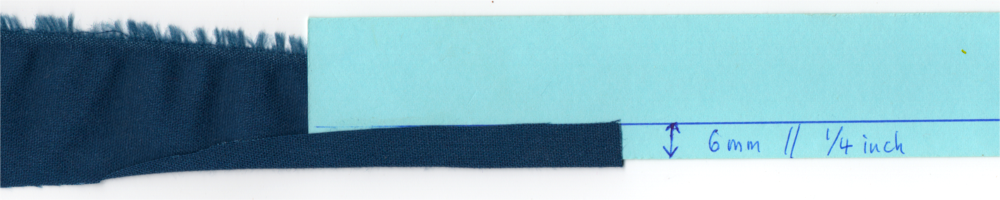
For the folded edge, you can either fold a small seam allowance (6mm //1/4 inch – for synthetics or fraying fabrics more) as you stitch along, or you can pre-crease it. I prefer pre-creasing as it speeds up the sewing process.
On a strip of cardboard (or folded photocopy paper) I mark the seam allowance with ruler and pen. I use this line as a guide for folding and finger pressing the crease or for ironing (especially when using synthetic fabrics that don’t hold the creases well).
Securing a folded edge
I hold the strip of fabric so the seam allowance is on the reverse and I face the right side of the fabric, but you can just as well turn it around so you can better see the seam allowance.
Fasten your thread at the beginning and end with a small buttonhole stitch. We’ll cut off the thread ends once we’ve inserted the ribbon in the hexie.
Securing with Running Stitch
This is the simplest way: Just stitch a line of Running Stitches along the edge. Make sure you catch the seam allowance on the back – 3mm // 1/8 inch distance to the fold is perfect.
Securing with Whip Stitch
Start at the left or right end of the strip, whatever works best for you.
Depending on how far from the fold you insert the needle, you’ll get a different result. You can even enclose the whole seam allowance in the stitch.
Samples
For all samples I used Pearl Cotton Nr. 5.
Different threads will give different results, as will different stitch length, distance to the edge or tension.
Just play around to see what you get 🙂
Click on images for larger size
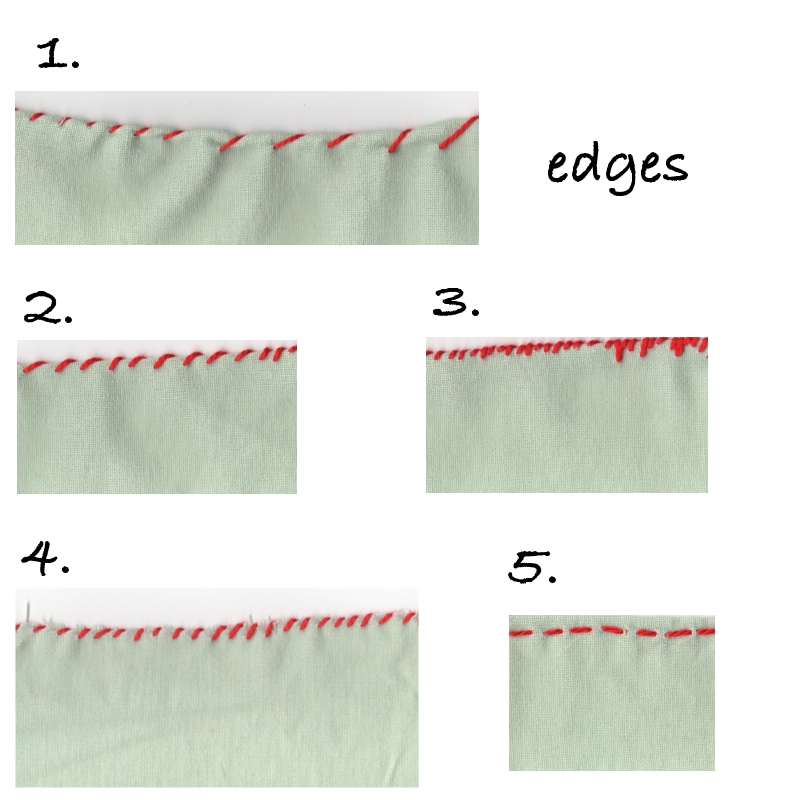
- Folded edge. I pulled the stitches very tight – can you see how the fabric rolls up into a sort of scalloped edge? The first few stitches are normal length and about 3mm // 1/8 inch away from the edge, the later stitches are about three times as long and at 6 mm // 1/4 inch distance to the edge.
- Folded edge. Normal stitch length, normal tension, 3mm // 1/8 inch from the edge.
- Folded edge. Very dense stitches, normal tension. The first stitches catch only a few threads of the edge, with the later ones the distance varies. I like these irregular stitches for a “flowery” look.
- Raw edge with normal stitch length, normal tension, about 3mm // 1/8 inch from the edge. It’ll fray a bit more with washing.
- Folded edge with Running Stitch.
Your task today
Turn at least one strip of fabric into a ribbon for use with a Trefoil Hexie.
Next time
Tomorrow = Day 4 I’ll show you how to embellish a Trefoil Hexie with a ribbon or the strip you made today.
Apart from that, you’ll need one Trefoil Hexie, sewing thread, a sewing needle and scissors.
Preview
Saturdays and Sundays are for catching up – “Day 5” will therefore be on Monday. I’ll show you then the first alternative for the center of your hexies.
In the meantime, your “homework” will be to embroider – as much as you want – all 3 or 4 hexies you cut on the first day and to embellish them with ribbons (or not, whatever you prefer).
If you have any questions, please post them in the comments.
{Note: This Sunday I won’t be near any internet access, which means I’ll reply to comments on Monday.}
Have a good weekend 🙂
Maria
